Episode 16: Adding depth

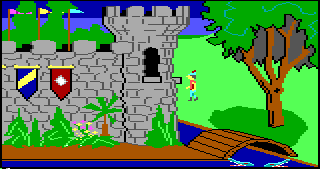
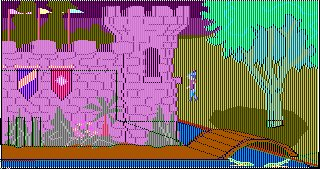
One of the cool things about the original King's Quest was how they added a sense of depth to a two-dimensional scene. Just check it out:
Sir Grahame emerges from behind the tree and walks around behind the well. And just a few seconds later, he is inside the well - the top half of the character is drawn over the back wall of the well, but the bottom half of the character is obscured by the front of the well. It's such a cool effect, especially for a game from 1984.
So how did they do it? We've added boundary lines so our player can't walk through objects, and we stop the player when his foot-line encounters one of the lines. But we also need to draw the player icon over a scene object if he's in front of it, but not draw the icon if he's behind it. We can use the player's Y-location for that. But the objects are also at different depths in the scene – you can be both behind one object and in front of another. So how do we even get started here?
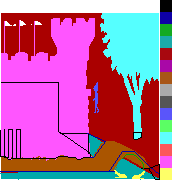
Now for a little bit of examination of the original game. Here is the opening scene.
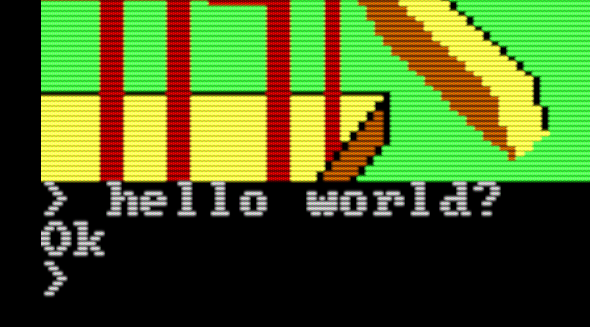
If you run King's Quest in DOSBox and dump the memory contents to a file, you'll see that the video memory (starting at 0x18000) contains the scene (in the weird four-bank, two-byte-per-pixel format of course). But you'll also find another part of memory that contains an odd version of the scene:
Remember in the last episode we were storing skeleton lines in the high nibble of each byte and color data in the low nibble? This looks suspiciously like that, but with extra data. Let's consider just the high nibble of each pixel:
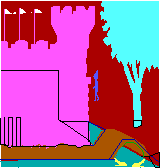
We see black lines which look a lot like our boundary lines from the last episode. We also see other colors of lines, perhaps signifying other things (like water boundaries and screen boundaries). But the most interesting is that the tree, castle, and Sir Grahame are filled in with solid colors. This data is akin to a depth buffer in 3D graphics – it holds depth information for every pixel.
You'll also notice that the King's Quest 1 scenes are not the full screen height – they're actually 168 pixels high. This leaves 32 pixel rows (4 lines of text at 8 lines high each) at the bottom for text interaction with the game – which we will build in a future episode. So we'll go ahead and rework our backyard scene to 168 pixels high:

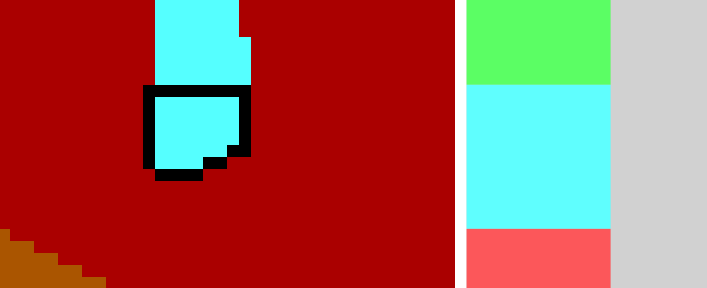
Now let's getting back to that weird King's Quest depth buffer. We notice that depth roughly corresponds to Y position of the base of each object (and Sir Grahame's foot-line) in this type of scene. And if we want to encode this depth information in the same size buffer as the color information, we have 16 colors for each pixel. But 16 doesn't divide evenly into 168! However, if we leave aside black and white (black is our boundary line color, and assume white will be used for something else later), the remaining 14 does divide evenly into 168, with 12 pixels each. Check the following:
We should be able to express the 'depth' of each pixel in the scene as one of the 14 remaining colors, evenly spread over the height range. And we should also be able to map our player to one of these colors, continuously updated as he moves up and down, by mapping the bottom of the icon into this 14-color range. But using the term 'depth' here is misleading, because a more depth is actually farther back into the scene, which would correspond to a lower depth number. So let's create a term, 'priority' to represent the inverse of depth. Higher priority means closer to the front, and lower priority means farther away.
Every time we redraw the icon we will compute the player's priority (at the foot-line) as one of these 14 values, then draw pixel-by-pixel, comparing the priority of the corresponding scene pixel to determine if we should draw the icon pixel or not.
Take the tree as an example. We can infer 2 rules:
- Behind the tree: Notice the boundary line has a hard stop at the top of the cyan range, so if the player is behind the tree, the highest priority he can be is light green. So if the player's priority is less than cyan, all icon pixels which overlap with the cyan of the tree should not be drawn.
- In front of the tree: The player can be within the bottom part of the cyan range, or any color below that. So if the player's priority is cyan or greater, all icon pixels which overlay with the cyan of the tree should be drawn.
Armed with this information, we can create a corresponding depth buffer for our scene, starting with our boundary line image from the last episode. Here's my attempt.

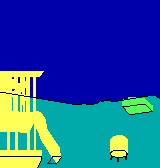
For me, it's still really hard to visualize what color each piece of the scene should be to achieve the depth I need, so I did a lot of trial and error. Two things that helped were:
- Having the 14-color bar, each color 12 pixels high, alongside the depth image
- Remembering that the depth of an object is basically defined by its base.
We can avoid figuring out depth information for the bushes, trees, and top of the playset since the player will never go there.
When the player moves, we convert the new Y position (of the foot-line) to a priority value – divide by 12 and add 1 (to make up for black which we're not using):
; ypos_to_priority()
; Converts the Y position in AX to a priority between 1 and 14 inclusive: floor( y/12 ) + 1
ypos_to_priority:
  push bx
  mov bx, 12
  div bx
  pop bx
  inc ax
  xor ah, ah
  ret
We'll pass that into the draw_icon routine, and down inside the .copy_byte loop, we'll sample the corresponding priority pixel before drawing each pixel of the icon. If greater, we'll draw the pixel; if not, we'll skip it:
.copyByte:
  lodsb
  ; If sprite pixel is transparent, skip it.
  test al, al
  jz .afterCopyByte
  ; If sprite has an equal or lower priority than corresponding base pixel, skip it.
  push es
  mov es, [BACKGROUND_SEG]
  mov bl, [es:di]
  xchg cl, dl
  shr bl, cl    ; Get the priority into BL
  xchg cl, dl
  pop es
  cmp bl, [bp+6]
  jg .afterCopyByte
To end, let's make a quick fix we should have made last time: Prevent the player from going offscreen. Let's add the following to the top of bound_player:
; Check the player's feet (bottom scanline of icon). If they have hit
; a hard boundary (mask=0), stop the walking motion and move back one
; unit.
bound_player:
  mov ax, [player_y]
  cmp ax, 0
  jle .bounce_back
  add ax, [player_icon+2]
  cmp ax, 168
  jg .bounce_back
  mov ax, [player_x]
  cmp ax, 0
  jl .bounce_back
  add ax, [player_icon]
  cmp ax, 320
  jg .bounce_back

  jmp .didnt_hit_wall

  .bounce_back:
  call bounce_back
  ret

  .didnt_hit_wall:
  ...
We're first going to load the player's Y position (this is the top of the icon, and compare against 0. This checks that we're not going off the top of the screen. We then add the player's height to get the Y position of his feet, and check against the height of the picture, 168. We then do the same thing with the player's left and right positions, checking against 0 and 320, the left and right sides of the screen. If the player has hit a border, we'll call bounce_back and return early.
And there we go! Our player can now be partially hidden behind other objects in the scene, and can't go offscreen. Check the video below!
Full source code for this episode is available on GitHub: https://github.com/josh2112/pcjr-asm-game/tree/episode-16