Episode 15: Adding Boundary Lines

In Episode 14 we wrote a Python script to take any 320x200 16-color PNG image and convert it to a format that can be used in our app, then we added code to load and display the image as our background. But our character just walks all over the image, seemingly having no connection with it. Can we prevent the character from walking in places he shouldn't walk – off the screen or in the water, for example? Can we perhaps even add some depth to the screen – making our character invisible as he walks behind the playset?
These things are possible if we add extra data to the image. This data will not be visible to the player, but will be used by the code to determine the ordering of objects in the image, and where the player can and can't walk. Since this is a big change to both the image format and the app, we will break it up into two parts. This episode will deal with adding "boundary" information to the image, then using it to restrict where the player can walk. In the next episode, we will tackle the concept of "depth", letting the app determine which parts of the character are hidden and visible based on the part of the room he is in.
As an aside...
By now you may have figured out, if you're familiar with early 80's PC games, that I'm attempting to make an adventure game similar to King's Quest 1, the game from Sierra commissioned by IBM upon the launch of the PCjr to show the world what it was capable of. It was an amazing game, presenting an interactive and immersive world like nothing else of its time. I am NOT going to explicitly remake KQ1. There's lots of information on the web about the Adventure Game Interpreter (AGI), the core code that ran KQ1 and subsequent Sierra games, and there are even tools that allow you to create brand-new adventure games using the AGI. What I'm attempting to do is pretend I'm a developer in 1983, thinking about the problems of writing such an adventure game, the problems we have to solve, and the hardware we have to solve them with. In some places I may reuse concepts from KQ1, in some places I may modify them or exclude them, and I may use different names for them. What I'm attempting to do is organically develop an adventure-style game similar to KQ1, while at the same time taking advantage of some of the inside information that is available about it.
...now back to the episode.
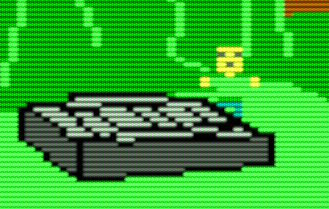
Our first thought may be to try and use the information already in the image to limit where the player can go – for example, only allow the character to walk on green grass and stop him when he hits any other surface, and this is indeed how a top-down, 2D game (PAC-MAN for example), would solve this problem. But the scene we've drawn has an element of depth to it – we know the playground is the closest object to us, followed by the firepit, and the green hill and sky on the other side of the lake are the furthest from us. So what if we did this? We could use the character's feet (the bottom line of the character image) as the indicator of where he is in the scene. We would stop the player's movement before his feet hit anything that wasn't green:
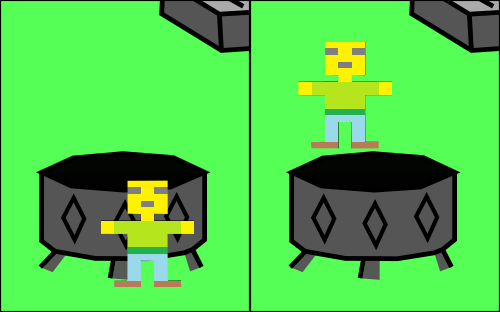
This would give us a great representation of standing right in front of an object (left pic) -- most of the body would overlap the object. But when standing behind (right pic), the feet wouldn't let us get directly behind an object, we'd always look like we're standing far behind it (or hovering above it!) Additionally, it would make practically the entire left side of the image, which is covered by the playset, off-limits!
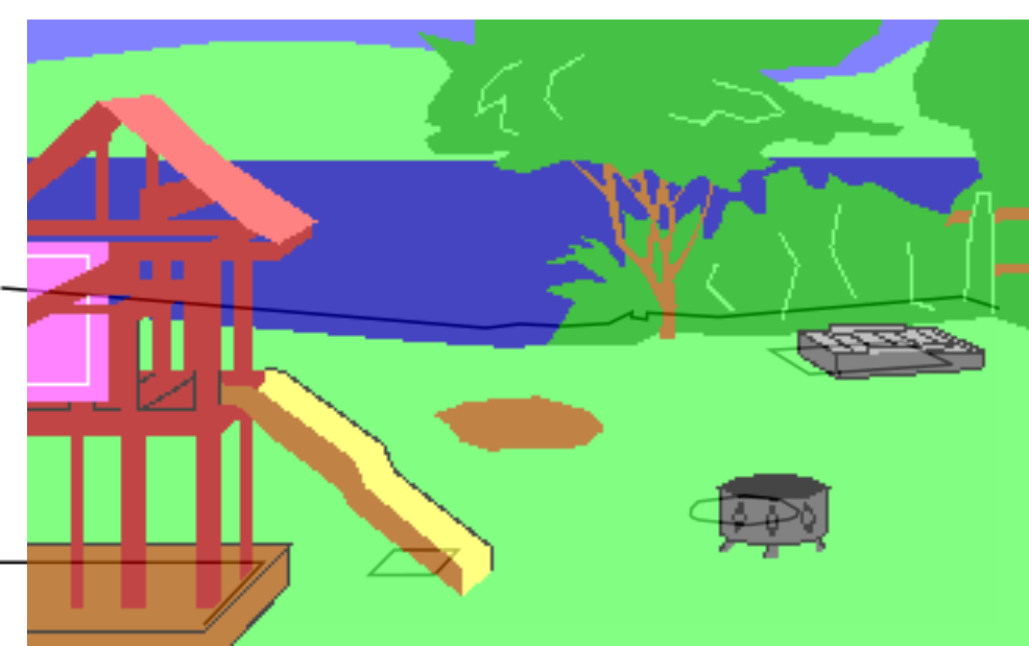
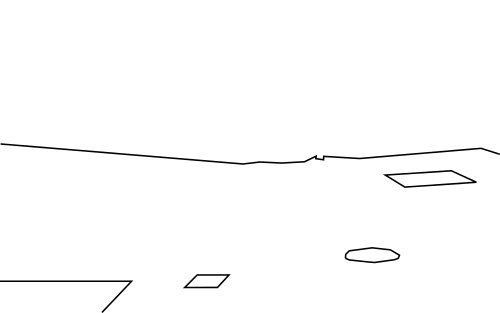
What we need is a type of mask; a hidden 'extra' image giving the game more detail about how the image is structured. This mask will be loaded with the background picture but not drawn. As the player moves around, the game will consult this mask to ensure where the player is about to walk is a valid spot, otherwise it will stop the player. Here is our background picture, and here is the mask for it – a blank image with "boundary lines" drawn in around the fireplace, sandbox, bottom of the slide, base of the play structure, and the lake.
But how do we get this mask into the app? After all, memory is precious and we're running out. My proposal is to cut the background image size in half -- to use half the existing background buffer for the image and the other half for the mask. It's hard to lose half the resolution of our beautiful image, but sacrifices must be made. Now, cutting the image size in half is a big change -- pixel (X,Y) in the image is no longer in the same place in memory -- but we'd like to change our existing rendering routines as little as possible. There's a way we can store both image and mask together, keeping the pixels in the same location as before, which will avoid major rewrites to blt_background_to_compositor. We can interleave the image and the mask.
The graphics mode we're using stores two pixels per byte. What if we were to make the image and mask half as wide, then combine a pixel from each into each byte? The first byte would contain the first pixel of the mask in the high 4 bits and the first pixel of the image in the low 4 bits, etc. The only change we'd need to make in our background-copying routine would be replace the rep movsb with:
copyByte:
mov al, [ds:di]
call nibble_to_byte_low
mov byte [es:di], al
inc di
loop .copyByte
and an additional small subroutine:
; Duplicates the low nibble of AL in the high nibble. Clobbers AH.
nibble_to_byte_low:
  and al, 0x0f ; Mask out the high 4 bits of the byte
  mov ah, al   ; Make a copy in AH
  shl ah, 1    ; Move the low nibble to the high
  shl ah, 1    ; (by shifting left 4 bytes)
  shl ah, 1
  shl ah, 1
  or al, ah    ; Combine the nibbles
  ret
When copying the pixel to the compositor, we copy the low 4 bits (the image pixel) over the high 4 bits (the mask pixel), essentially doubling each image pixel for a width of 160 instead of 320.
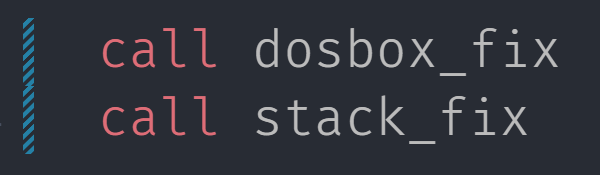
Now we just have to stop the player when he runs into one of these boundary lines. After call process_key, call the following subroutine:
; Check the player's feet (bottom scanline of icon). If they have have hit a
; hard boundary (mask=0), stop the walking motion and move back one unit.
bound_player:
  mov ax, [player_y]
  add ax, [player_icon+2]
  dec ax     ; AX = player foot-line
  ; Compute starting location for player foot-line in framebuffer
  ; SI = (AX * 320 + x) / 2
  mov bx, [room_width_px]
  mul bx           ; AX *= 320
  add ax, [player_x]   ; ... + x
  shr ax, 1        ; ... / 2
  mov si, ax
  mov cx, [player_icon+0]
  shr cx, 1
  push ds            ; DS to source (FB)
  mov ds, [BACKGROUND_SEG]
  xor ah, ah
  .checkPixel:
    mov al, [ds:si]
    ; The mask is the upper 4 bits, and we're trying to see if it has
    ; a value of 0 (vs 0xf). Therefore we can just check whether the whole
    ; byte is less than 0x10. NOTE: We must use JB (jump below) here
    ; instead of JL (jump if less than) because our numbers are not signed
    cmp al, 0x10
    jb .foundBorder
    inc si
    loop .checkPixel

  pop ds
  ret
  .foundBorder:
    pop ds
    call bounce_back
    ret
Every time the player moves, we'll check his feet... each pixel in the bottom scanline of the player's icon. If the mask value is 0 at any of those pixel locations, we know we've hit a boundary line, and we should stop. But at this point we're ON the boundary line, so we should 'back up' the player by one pixel. This is all done in a subroutine called bounce_back.
To implement bounce_back, assume we have the player's direction as a constant (DIR_LEFT = 1, DIR_RIGHT = 2, etc.) in a memory location called player_walk_dir (we'll worry about it later):
bounce_back:
  mov byte bl, [player_walk_dir]
  cmp bl, DIR_LEFT
  jne .next
  mov bl, DIR_NONE
  inc word [player_x]
  inc word [player_x]
  .next:
    cmp bl, DIR_RIGHT
    jne .next2
    mov bl, DIR_NONE
    dec word [player_x]
    dec word [player_x]
  .next2:
    cmp bl, DIR_UP
    jne .next3
    mov bl, DIR_NONE
    inc word [player_y]
  .next3:
    cmp bl, DIR_DOWN
    jne .done
    mov bl, DIR_NONE
    dec word [player_y]
  .done:
    ret
Pretty simple; we just move the player 1 pixel in the opposite direction we were traveling. Now we need to store player_walk_dir. This is not too bad. First %define some directional constants. Next, in process_key, instead of moving the player, just set player_walk_dir. Finally, between the calls to process_key and bound_player, call a subroutine which looks at the player's walk direction and moves him appropriately.
And that's about it! When you run the app, your player should stop at those invisible boundary lines. Stay with us for the next episode when we add some depth to the scene.
Full source for this episode is available on GitHub: https://github.com/josh2112/pcjr-asm-game/tree/episode-15